Sunday, January 31, 2010

Piggybacking

Ah, the interweb. Killer of too much time, provider of useful and... not so useful information, and sharer of tasty meal ideas. This week's recipe comes from Noble Pig. She's a food and wine enthusiast with some great photos to accompany her recipes.

Now last week the B.L.T. Project covered breakfast, life's most often neglected meal. This week, the Project is moving on and hanging out with breakfast's swankier cousin: brunch. And what's brunch without a little Eggy in a Bread-Bowl?

The beauty of this recipe lies in its versatility and simplicity. If you can make toast, you can make this dish. If you can crack an egg, you can make this dish. And if you can do both... well why are you still reading this? Get cooking!


Eggy in a Bread-Bowl
Adapted from Noble Pig. Her original recipe can be found here.

Ingredients:

- Four (4) whole-wheat buns
- Four (4) large eggs
- Two slices (2) of deli-cut turkey breast, cut into smaller bite-sized squares.
- Two (2) minced sprigs of basil
- Two (2) slices of swiss cheese, cut each slice into sixteen (16) smaller squares
- One (1) Roma tomato
- Salt and pepper

Makes four bread-bowls


1. Let's start by slicing the top of the bun (aim for the top quarter) and remove the inside dough so that a large egg can fit inside. Set aside the tops of the bun and removed dough.


2. Mince basil and tomatoes. Mix together and spoon enough of the mixture to lightly cover the bottom of the bread bowl. Now crack an egg into each bun.


3. Add salt and pepper according to taste. Next, layer turkey and cheese until the top of the bowl is covered. Place the bowls on a baking rack.


4. Spoon remaining tomato-basil mixture on top of the bowl and bake at 350°F (about 177°C) for 25 minutes so the bread is toasted and the eggs are set. After the first 20 minutes of baking, add the top of the bun and continue baking until tops are a nice golden brown.


5. Let the bowls cool down for 5 minutes and savor.


A Few Tips:

-Use the top of the bun and the removed dough to mop up any of that yolky-goodness that's escaped your mouth!

-Not a fan of tomato and basil? Not a problem! As mentioned above, this recipe is very versatile. Use can use just about whatever you've got in your fridge.

-Thanks goes out to Constance Chan for sharing Noble Pig with me in the first place.

Sunday, January 24, 2010

These cakes are bananas. B-A-N-A-N-A-S!

Ah breakfast, it's arguably the most important meal of the day yet it's the most overlooked and who can blame it?

The thing about breakfast is that it contends with this thing called sleep. Perhaps you've head of it? That thing university students need and crave, yet rarely get enough of? Yup, we're talking about sleep alright.

The reality is that breakfast takes some effort and effort takes away from time to sleep. Sleep is important but so is food... so what's a student supposed to do?

The answer? Make pancakes!


Chocolate-chip Banana Pancakes
Adapted from the Guy can't Cook, by Cinda Chavich

Ingredients:

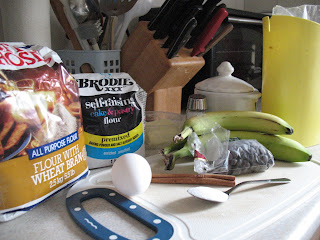
-1/2 cup (125 mL) whole wheat flour
-1/2 cup (125 mL) all-purpose flour
-1 1/2 tsp (7 mL) baking powder
-1/2 tsp (2 mL) baking soda
-1/4 tsp (1 mL) grounded cinnamon
-2 Tbsp (30 mL) granulated sugar
-Pinch of salt
-1/4 cup ( 75 mL) bittersweet chocolate chips (you can substitute milk or dark chocolate chips if you'd like)

-1 (one) large egg
-1 cup (250 mL) buttermilk or plain yogurt (you can substitute 2% milk instead)
-2 Tbsp (30 mL) butter
-3/4 cups (175 mL) mashed bananas (About 2 1/2 bananas- save the other half for garnishing)

Makes about 8 pancakes


A Few Tips:

-Use ripe bananas for these pancakes. They pack more flavour as well as sweetness and are far easier to mash. You can still use unripened bananas if you need to, but you'll definitely lose out of flavour.

-Use a potato masher to mash bananas if a fork isn't working out.

-These cakes have been made with self-raising flour before. Self-raising flour already mixes in the baking powder and salt, so it'll shave off a few seconds while you're in the kitchen.


1. If you're working with limited cooking space (ie: a small frying pan) you'll want to set your conventional toaster oven to 200°F (95°C) to keep your first few pancakes nice and warm.

2. In a large mixing bowl, add the two flours, sugar, baking powder, baking soda (if using), cinnamon and chocolate chips together.

3. In another bowl, whisk together the mashed bananas, melted butter, egg, and buttermilk/yogurt/milk together.


4. Making an opening in the bowl of the dry ingredients and then add the banana mixture and stir until evening is moist.


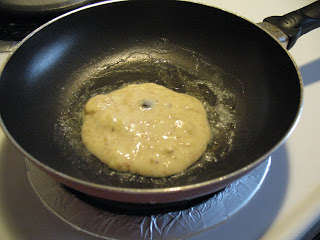
5. Set your frying pan/skillet over a medium-high heat and lightly coat with some butter. Reduce to a low-medium heat and spoon in 3-4 Tbsp of the pancake mixture to make a 4 inch pancake.


6. When bubbles start rising to the top of the pancake you'll be ready to flip them. This generally takes about 2 minutes. A visual cue will be a nice, golden brown side when you give 'em a flip.


7. Move any finished pancakes to the oven while the others cook. When everything's done, transfer the cakes to a plate, garnish with left over bananas, chocolate chips, and a drizzle of maple syrup.


8. Savor.


What's great about this recipe is that the batter can be made the night before. Store it in a container so that it's ready to go in a frying pan the next morning. Also, bananas are a great source of potassium which, anecdotally, help out with hangovers. Give this recipe a try on a lazy Sunday morning after a crazy Saturday night or when you want a nice change from butter and toast.

Saturday, January 16, 2010

LOL I 8 UR B.L.T.

Oh, you're still here. Good for you. Most people would've clicked onto another page after seeing the title of today's post. Well you can relax now, it's proper grammatical English from here on folks.

It's only fitting that a site named after a sandwich feature that said sandwich as its first post. So without further ado ladies and gentlemen, I give you Project B.L.T.

Adapted from the Guy can't Cook, by Cinda Chavich

Ingredients:

- Four (4) slices of garlic bread
- Three (3)tsp of oil
- Two (2) Tbsp of mayonnaise
- Four (4) thick slices of double-smoked side bacon
- Two (2) thick tomato slices (preferably of Hot House variety)
- Two (2) slices of your favourite cheese (Havarti is always good)
- Shredded iceberg lettuce
- Washed (baby or regular variety) spinach

Makes two sandwiches


1. You'll want to begin by setting your conventional toaster oven to 300°F (150° C). Now spread the mayo on both slices of garlic bread. Next, layer the spinach on one slice of bread and cheese on the other. Toast the garlic bread for 5 minutes. This step generally varies toaster oven to toaster oven, so adjust accordingly.

2. Meanwhile, heat three tsp of oil in a frying pan at med-low heat. Fry bacon for about 2 minutes per side until bacon is nicely rendered, but not overly crispy. Remove cooked bacon onto a sheet of kitchen towel. The garlic bread should be ready by now, so remove and let cool for about 2 minutes.


3. Layer on the lettuce and tomatoes on one slice of the bread, top it of with the other slice, and you're clear!


4. Savor.